Step-by-Step Guide to Prepare Super Quick Homemade Chick Peas Salad

Step-by-Step Guide to Prepare Super Quick Homemade Chick Peas Salad

Chick Peas Salad.

Chick Peas Salad

Hello everybody, it is me again, Dan, welcome to my recipe page. Today, we're going to make a special dish, chick peas salad. One of my favorites. This time, I'm gonna make it a little bit tasty. This is gonna smell and look delicious.

Chick Peas Salad is one of the most favored of recent trending meals in the world. It's easy, it's quick, it tastes delicious. It is appreciated by millions every day. Chick Peas Salad is something which I have loved my entire life. They're fine and they look wonderful.

To begin with this recipe, we have to prepare a few ingredients. You can cook chick peas salad using 9 ingredients and 8 steps. Here is how you cook that.

The ingredients needed to make Chick Peas Salad:

  1. {Prepare of Chick Peas.
  2. {Make ready of Cucumber.
  3. {Prepare of Red Pepper.
  4. {Make ready of shredded Carrot.
  5. {Get of Ground Black Pepper.
  6. {Get of Salt.
  7. {Make ready of Thyme.
  8. {Get of Olive oil.
  9. {Prepare of Red Pepper Flakes.

Instructions to make Chick Peas Salad:

  1. Drain Chick peas and rinse.
  2. Add salt and black pepper to frying pan.
  3. Fry chick peas on low heat.
  4. Dice cucumber and red peppers.
  5. Shred carrots.
  6. Mix all ingredients in a salad bowl.
  7. Drizzle olive oil and mix.
  8. Add salt and/or black pepper to taste.

So that's going to wrap it up with this exceptional food chick peas salad recipe. Thank you very much for reading. I'm confident that you will make this at home. There is gonna be interesting food at home recipes coming up. Remember to bookmark this page in your browser, and share it to your loved ones, colleague and friends. Thank you for reading. Go on get cooking!

Step-by-Step Guide to Prepare Homemade Roasted Chicken noodle soup

Step-by-Step Guide to Prepare Homemade Roasted Chicken noodle soup

Roasted Chicken noodle soup.

Roasted Chicken noodle soup

Hello everybody, it is Louise, welcome to my recipe site. Today, I'm gonna show you how to prepare a special dish, roasted chicken noodle soup. It is one of my favorites. For mine, I will make it a bit unique. This is gonna smell and look delicious.

Roasted Chicken noodle soup is one of the most favored of current trending meals on earth. It is easy, it's quick, it tastes delicious. It's enjoyed by millions daily. They're nice and they look wonderful. Roasted Chicken noodle soup is something that I've loved my entire life.

To get started with this particular recipe, we must prepare a few ingredients. You can have roasted chicken noodle soup using 11 ingredients and 11 steps. Here is how you cook that.

The ingredients needed to make Roasted Chicken noodle soup:

  1. {Take 1 of whole chicken.
  2. {Take 2 pounds of carrots (cut in large chunks).
  3. {Make ready 1 pound of celery hearts (cut in large chunks).
  4. {Prepare 1 pound of "no yolk" extra wide egg noodles.
  5. {Prepare of enough water to fill a large stock pot halfway or more.
  6. {Make ready 6-8 of chicken bullion cubes.
  7. {Prepare 1 of onion sliced thin (optional).
  8. {Make ready of coconut oil to Sautee onion (optional).
  9. {Prepare to taste of salt.
  10. {Get to taste of Pepper (coarse ground).
  11. {Make ready of butter to roast chicken.

Steps to make Roasted Chicken noodle soup:

  1. Preheat oven to 400°F. Take your whole chicken and cut through the backbone and spread out in a baking pan. This process is also called spatchcocking. The breasts should be in the middle with legs and wings facing outward. The inside of the chicken should be facing down in the pan..
  2. Now you will rub your chicken down with the butter, salt, and pepper. Don't be scared be generous with the love. If you want you can add different seasonings such as rosemary, red pepper flakes, or some Tony's. This is just the basics..
  3. Add a small amount of water to your pan. Maybe an inch to an inch and a half. Now place the pan with your chicken in it in the preheated oven..
  4. Your chicken should roast for about 30 minutes to an hour depending on the size. The skin should get nice and crispy. Your chicken is done when you poke it with a fork through the thickest part or close to the thigh joints and it no longer bleeds. Clear fluid should come out..
  5. Once chicken is finished roasting set it to the side or in the fridge to cool off..
  6. While chicken is cooling get a large pot, such as a stock pot, add water and bullion cubes and bring to a boil. I also added the juice from the pan the chicken was roasted in. You can also add garlic powder, onion powder, or other spices as you would like..
  7. Once your liquid is boiling add your carrots and celery hearts to the pot and turn down to a slow simmer. Taste and make sure it's flavors are where you want them to be. Adjust as necessary..
  8. As that is cooking you will need to debone your chicken. As you're pulling the meat off add it to the pot. I also pull the skin off and cut into small pieces before adding to the pot. Same as the beasts..
  9. Let simmer together to get all the flavors going for about 30 minutes. Once you can stick a fork through the carrot pieces it is cooked. Turn off heat and dump all the raw egg Noodles in and stir. The hot liquid will cook them perfectly. In about 10-15 minutes it will be complete..
  10. Also if you would like I take my onion slices and caramelize in a pan using coconut oil. I cook until soft and brown and yummy. Then when I fix my bowl of soup I put some of these on top and it is fantastic. I have to do this as the kiddos don't like onion. But I love it. I also like to add a squirt of lemon juice on top..
  11. Sit down and enjoy with your favorite beverage.

So that is going to wrap it up with this exceptional food roasted chicken noodle soup recipe. Thank you very much for reading. I'm sure that you can make this at home. There's gonna be more interesting food at home recipes coming up. Don't forget to bookmark this page in your browser, and share it to your loved ones, friends and colleague. Thank you for reading. Go on get cooking!

Simple Way to Prepare Favorite Stuffed green pepper taco with Parma chip

Simple Way to Prepare Favorite Stuffed green pepper taco with Parma chip

Stuffed green pepper taco with Parma chip.

Stuffed green pepper taco with Parma chip

Hello everybody, I hope you're having an amazing day today. Today, I'm gonna show you how to make a distinctive dish, stuffed green pepper taco with parma chip. One of my favorites. For mine, I will make it a bit unique. This is gonna smell and look delicious.

Stuffed green pepper taco with Parma chip is one of the most favored of recent trending foods on earth. It is enjoyed by millions every day. It is simple, it is quick, it tastes yummy. They are fine and they look wonderful. Stuffed green pepper taco with Parma chip is something which I've loved my whole life.

To get started with this recipe, we have to prepare a few components. You can cook stuffed green pepper taco with parma chip using 17 ingredients and 7 steps. Here is how you can achieve that.

The ingredients needed to make Stuffed green pepper taco with Parma chip:

  1. {Take 1/2 pound of extra lean beef.
  2. {Make ready 6 of green peppers (save 2 tops to dice).
  3. {Prepare 2 of bell peppers diced.
  4. {Take 1/4 of diced red onion.
  5. {Prepare 1/2 of diced jalapeño.
  6. {Take of Cherry tomatoes (quartered).
  7. {Take of Rice cauliflower.
  8. {Get of Minced garlic.
  9. {Make ready of Ketchup.
  10. {Take of Water.
  11. {Take of Taco seasoning.
  12. {Make ready of Cheddar cheese.
  13. {Make ready of Parmesan cheese crisp.
  14. {Get 1 tbsp of parmesan cheese.
  15. {Prepare 1 slice of jalapeño.
  16. {Prepare of Shredded cheddar cheese.
  17. {Prepare of Bake at 350' until golden brown top sprinkle of shredded cheese.

Steps to make Stuffed green pepper taco with Parma chip:

  1. Cook ground beef.
  2. Add Garlic, onion, bell peppers, tomatoes, jalapeño & ketchup.
  3. Add rice cauliflower then taco seasoning with a little bit of water.
  4. Cook until ready then stuff green peppers top with shredded cheese.
  5. Put parmesan cheese on parchment paper then place fresh slice jalapeño and press down.
  6. Baked at 350' until golden brown then top with a little bit shredded cheese...place in oven to melt.
  7. Gently place Parma chip on top of green pepper taco and bake until green pepper is ready to eat.

So that is going to wrap it up with this special food stuffed green pepper taco with parma chip recipe. Thank you very much for your time. I'm confident that you can make this at home. There is gonna be more interesting food at home recipes coming up. Don't forget to bookmark this page in your browser, and share it to your family, colleague and friends. Thanks again for reading. Go on get cooking!

Step-by-Step Guide to Prepare Speedy Gateau Chocolat (Bittersweet
Chocolate Cake)

Step-by-Step Guide to Prepare Speedy Gateau Chocolat (Bittersweet Chocolate Cake)

Gateau Chocolat (Bittersweet Chocolate Cake).

Gateau Chocolat (Bittersweet Chocolate Cake)

Hello everybody, it is Jim, welcome to my recipe page. Today, I will show you a way to prepare a special dish, gateau chocolat (bittersweet chocolate cake). One of my favorites. This time, I'm gonna make it a little bit tasty. This will be really delicious.

Gateau Chocolat (Bittersweet Chocolate Cake) is one of the most well liked of current trending meals on earth. It's simple, it is fast, it tastes yummy. It's enjoyed by millions every day. Gateau Chocolat (Bittersweet Chocolate Cake) is something which I've loved my whole life. They are fine and they look fantastic.

To get started with this recipe, we must first prepare a few ingredients. You can cook gateau chocolat (bittersweet chocolate cake) using 14 ingredients and 25 steps. Here is how you can achieve that.

The ingredients needed to make Gateau Chocolat (Bittersweet Chocolate Cake):

  1. {Take of Gateau Chocolat.
  2. {Make ready 135 g (4.8 oz) of couverture chocolate, cacao 56%.
  3. {Prepare 75 g (2.6 oz) of unsalted butter.
  4. {Make ready 60 g of (2.1 oz, 1/4 us cup) heavy cream.
  5. {Make ready 42 g of (1.5 oz, 4.7 Tbsp) cake flour.
  6. {Take 55 g of (1.9 oz, 9 Tbsp) cocoa powder, sugar-free.
  7. {Prepare 4 of egg yolks.
  8. {Get 50 g of (1.8 oz, 1/4 us cup) granulated sugar, for egg yolk.
  9. {Get 5 of egg whites.
  10. {Prepare 100 g of (3.5 oz, 1/2 us cup) granulated sugar, for egg white.
  11. {Make ready of powdered sugar for dusting.
  12. {Take of Topping.
  13. {Take of whipped heavy cream (no sugar added).
  14. {Take of mint.

Steps to make Gateau Chocolat (Bittersweet Chocolate Cake):

  1. ★Recipe video★ (my You Tube channel)→youtu.be/DeSZPAIVjL4.
  2. Grease the pan with unsalted butter. Line the pan with parchment paper. Set aside..
  3. Cut the unsalted butter into thin or small pieces, and put them in a bowl. Add chocolate (small pieces) into the bowl with the butter..
  4. Put the cake flour and cocoa powder into a bowl. Mix well while crushing lumps; set aside. Preheat an oven to 200℃ / 392F..
  5. Separate egg yolks from egg whites. (4 egg yolks, 5 egg whites) Put the egg white in a large bowl. Let the egg white sit in a fridge..
  6. Add granulated sugar to the egg yolks. Mix it for 2 mins until whitish and heavy. Set aside..
  7. Pour water into a small pot. Bring the water to a boil and then turn off the heat. Place the bowl with chocolate and butter on the top of the pot. Place the bowl so as not to touch the hot water directly (to prevent separating). Wait for 30 sec..
  8. Melt the chocolate and butter until smooth. Warm the heavy cream until it comes out steam lightly. (until around 50℃ / 122F), microwave it at 500W for 40-60 sec..
  9. Add the warmed heavy cream to the chocolate in 4-5 parts. Mix well until combined each time. If the cream is too hot, the chocolate may separate, so be careful. Takedown the bowl. Takedown the pot too, and set aside the pot for later use..
  10. Mix the egg yolk mixture lightly. Add half of the melted chocolate. Mix it with a whisk until combined..
  11. Add the other half. Mix it until glossy for around 1 min. Place it on the pot to prevent it from getting cold..
  12. Take the egg white out from the fridge. Beat it lightly until watery. Whip it with a hand mixer on high speed until whitish and fluffy..
  13. Add half of the granulated sugar. Whip it on high speed until heavy. Add the remaining sugar. Whip it on high speed until the peak hangs down deeply..
  14. Whip slowly on low speed for a min to smooth it..
  15. Mix the chocolate mixture lightly. Add the meringue in 4 parts. Stir well with a whisk until combined at 1st addition..
  16. And then sift half of the dry ingredients over. Stir well until smooth..
  17. Meringue; 2nd addition, stir roughly until marble-ish..
  18. Sift the remaining dry ingredients over. Stir well until smooth..
  19. Meringue; 3rd addition, mix the top lightly, and scoop the batter up and let it slip through your whisk; repeat scooping. Continue to scoop until almost combined..
  20. Meringue; 4th addition, mix in the same way as the 3rd addition until combined. And then use a spatula to scrape the batter on the inner side of the bowl, and fold it..
  21. Pour the batter into the pan. Drop the pan lightly to remove big bubbles. Bake it at 180℃ / 356 F for 40-45 mins until the top of your cake crack..
  22. Drop the freshly baked cake lightly about 2 times. Let it cool as it is for about 4 hours. It'll slowly go down..
  23. Remove the cake from the pan. Peel the paper gently. Use plastic wrap to wrap it double. Let it sit in a fridge for 1-2 days..
  24. Dust the cake with powdered sugar. Top with whipped heavy cream and mint. Done!! This cake has a strong bitter taste on the first day. You should sit in a fridge for 1-2 days to get a nice mild flavor. The second day is my favorite..
  25. (The best-by date is about 4 days. When storing, wrap it with plastic wrap and put it in the fridge. If you want to get a soft texture, let it sit at room temperature, or warm a little with a microwave.).

So that is going to wrap it up for this special food gateau chocolat (bittersweet chocolate cake) recipe. Thank you very much for your time. I am sure you can make this at home. There is gonna be interesting food at home recipes coming up. Don't forget to bookmark this page on your browser, and share it to your loved ones, friends and colleague. Thanks again for reading. Go on get cooking!

Easiest Way to Make Ultimate One pot beef taco pasta skillet

Easiest Way to Make Ultimate One pot beef taco pasta skillet

One pot beef taco pasta skillet.

One pot beef taco pasta skillet

Hey everyone, I hope you are having an amazing day today. Today, we're going to prepare a distinctive dish, one pot beef taco pasta skillet. It is one of my favorites. For mine, I am going to make it a bit unique. This is gonna smell and look delicious.

One pot beef taco pasta skillet is one of the most popular of current trending meals in the world. It is enjoyed by millions every day. It is simple, it is quick, it tastes yummy. One pot beef taco pasta skillet is something which I've loved my entire life. They are nice and they look fantastic.

To begin with this recipe, we must first prepare a few ingredients. You can cook one pot beef taco pasta skillet using 11 ingredients and 7 steps. Here is how you can achieve that.

The ingredients needed to make One pot beef taco pasta skillet:

  1. {Prepare of ground beef.
  2. {Make ready of onion, diced(optional).
  3. {Take of green pepper, diced (optional).
  4. {Make ready of minced garlic.
  5. {Prepare of taco seasoning.
  6. {Take of salsa (I substitute a half of can of tomatoes with green chili’s).
  7. {Take of can tomato sauce.
  8. {Get of (12oz)box bow tie uncooked pasta shells.
  9. {Take of beef broth (add more if needed or add more water).
  10. {Make ready of shredded cheddar cheese.
  11. {Get of I added a splash of milk, when adding the cheese and I used velveete cheese (optional).

Instructions to make One pot beef taco pasta skillet:

  1. Brown the beef, onion, green pepper, and garlic until no pink remains. Drain any fat..
  2. Add in the taco seasoning, the salsa, tomato sauce, the beef broth and the pasta shells..
  3. Stir to combine and bring to a boil..
  4. Cover and simmer over medium-low heat stirring occasionally 20 minutes or until pasta is tender. (add more broth or water if needed) the original recipe called for 2 cups but I changed the amount of pasta to more and changed the pasta noodle type as well, was just some of my changes. so when I made this I think I used 3 cups I did add water to the Original recipe I was using.).
  5. Remove from heat and stir in 1 cup cheddar cheese..
  6. Top with diced tomatoes, sour cream or any other taco toppings you would like..
  7. I think if you added Frito chips to the top of this it would taste like the hamburger helper taco..

So that is going to wrap this up for this special food one pot beef taco pasta skillet recipe. Thanks so much for reading. I'm confident you can make this at home. There is gonna be interesting food in home recipes coming up. Remember to bookmark this page on your browser, and share it to your loved ones, friends and colleague. Thank you for reading. Go on get cooking!

Steps to Prepare Favorite Filipino Street Style Pork Siomai (SHO-my)

Steps to Prepare Favorite Filipino Street Style Pork Siomai (SHO-my)

Filipino Street Style Pork Siomai (SHO-my).

Filipino Street Style Pork Siomai (SHO-my)

Hey everyone, I hope you're having an incredible day today. Today, we're going to make a distinctive dish, filipino street style pork siomai (sho-my). One of my favorites. This time, I'm gonna make it a bit unique. This is gonna smell and look delicious.

Filipino Street Style Pork Siomai (SHO-my) is one of the most popular of current trending meals on earth. It is easy, it's fast, it tastes yummy. It is enjoyed by millions daily. They're nice and they look wonderful. Filipino Street Style Pork Siomai (SHO-my) is something that I have loved my whole life.

To get started with this particular recipe, we have to first prepare a few ingredients. You can have filipino street style pork siomai (sho-my) using 12 ingredients and 5 steps. Here is how you cook that.

The ingredients needed to make Filipino Street Style Pork Siomai (SHO-my):

  1. {Prepare of ground pork.
  2. {Get of medium carrot, minced.
  3. {Prepare of small onion, minced.
  4. {Make ready of garlic, minced.
  5. {Get of green onion, sliced thinly.
  6. {Take of salt.
  7. {Take of garlic.
  8. {Take of sesame oil.
  9. {Get of oyster sauce.
  10. {Make ready of thin wanton wrappers.
  11. {Prepare of Lemon.
  12. {Take of Soy sauce.

Instructions to make Filipino Street Style Pork Siomai (SHO-my):

  1. Mix all ingredients, except wanton wrappers, in a bowl. Cover and refrigerate for at least 1 hour to let the flavor set in..
  2. When ready to cook, heat enough water in a pot. Then make sure to brush surface of steamer with a bit of oil or butter to prevent siomai from sticking to it..
  3. Wrap the siomai: Hold a wrapper flat on one palm and scoop 1 Tbsp of siomai filling with the other hand, placing it on the middle of the wrapper. Fold the sides to cover the filling well..
  4. Arrange the wrapped siomai on the buttered/oiled steamer and steam on the boiling pot of water for 18 minutes. (My steamer was kind of small and I was able to steam only 12-14 pieces at a time... so I steamed 3 batches in total.).
  5. After 18 minutes, siomai is ready to enjoy with lemon juice and soysauce for dipping..

So that is going to wrap it up with this exceptional food filipino street style pork siomai (sho-my) recipe. Thanks so much for your time. I am sure that you can make this at home. There's gonna be interesting food in home recipes coming up. Don't forget to save this page in your browser, and share it to your loved ones, friends and colleague. Thank you for reading. Go on get cooking!

Step-by-Step Guide to Prepare Award-winning Peach Glazed Pork Chops
with Cornbread Stuffing

Step-by-Step Guide to Prepare Award-winning Peach Glazed Pork Chops with Cornbread Stuffing

Peach Glazed Pork Chops with Cornbread Stuffing.

Peach Glazed Pork Chops with Cornbread Stuffing

Hey everyone, I hope you are having an incredible day today. Today, I will show you a way to prepare a distinctive dish, peach glazed pork chops with cornbread stuffing. It is one of my favorites food recipes. This time, I will make it a little bit tasty. This is gonna smell and look delicious.

Peach Glazed Pork Chops with Cornbread Stuffing is one of the most well liked of current trending meals in the world. It is appreciated by millions daily. It is easy, it is fast, it tastes delicious. They're fine and they look wonderful. Peach Glazed Pork Chops with Cornbread Stuffing is something that I have loved my whole life.

To get started with this recipe, we must prepare a few ingredients. You can have peach glazed pork chops with cornbread stuffing using 10 ingredients and 5 steps. Here is how you cook it.

The ingredients needed to make Peach Glazed Pork Chops with Cornbread Stuffing:

  1. {Get of pork chops.
  2. {Make ready of salt.
  3. {Get of black pepper.
  4. {Prepare of sliced peaches, 15 oz, drain, reserving the syrup.
  5. {Get of light brown sugar, firmly packed.
  6. {Make ready of ketchup.
  7. {Prepare of apple cider vinegar.
  8. {Take of very hot tap water, 1/4 cup cup peach syrup may be used for 1/4 cup water.
  9. {Get of softened butter.
  10. {Take of cornbread Stovetop stuffing or pork flavor stuffing.

Steps to make Peach Glazed Pork Chops with Cornbread Stuffing:

  1. Season pork chips with salt and pepper. Brown well in oil in a large skillet. Place in shallow baking dish..
  2. Drain peaches, reserving the syrup. To make glaze, heat sugar, ketchup, apple cider vinegar, and 1/3 cup of the peach syrup in a saucepan until thicken..
  3. Brush pork chops with some of the glaze. Bake at 350° for 35 minutes, pour off fat..
  4. Meanwhile while chops are cooking, pour hot water and butter into the skillet. Stir to melt the butter. Add the stuffing mix and stir to moisten..
  5. Move the pork chops to one side of baking dish. Spoon the stuffing to the other side. Arrange the sliced peaches around the pork chops. Brush the remaining glaze on top of everything. Bake for 20 minutes longer..

So that is going to wrap this up for this special food peach glazed pork chops with cornbread stuffing recipe. Thank you very much for your time. I'm confident you will make this at home. There is gonna be more interesting food in home recipes coming up. Remember to save this page on your browser, and share it to your family, colleague and friends. Thank you for reading. Go on get cooking!

Simple Way to Prepare Quick My Version Caesar Salad with Sweet
Potato "croutons"

Simple Way to Prepare Quick My Version Caesar Salad with Sweet Potato "croutons"

My Version Caesar Salad with Sweet Potato "croutons".

My Version Caesar Salad with Sweet Potato "croutons"

Hello everybody, it is Brad, welcome to my recipe page. Today, we're going to prepare a special dish, my version caesar salad with sweet potato "croutons". One of my favorites food recipes. For mine, I will make it a bit unique. This is gonna smell and look delicious.

My Version Caesar Salad with Sweet Potato "croutons" is one of the most favored of current trending foods on earth. It is appreciated by millions daily. It is simple, it is fast, it tastes delicious. They are nice and they look fantastic. My Version Caesar Salad with Sweet Potato "croutons" is something which I have loved my entire life.

To get started with this particular recipe, we have to prepare a few ingredients. You can cook my version caesar salad with sweet potato "croutons" using 16 ingredients and 5 steps. Here is how you cook it.

The ingredients needed to make My Version Caesar Salad with Sweet Potato "croutons":

  1. {Take 2 of sweet potatos cooked, cooled, peeled and cut into 1 inche cubes. You can bake or microwave them until tende but cut into cubes when cold so they will keep their shape.
  2. {Get 1 of canola oil for frying.
  3. {Make ready 8 cup of torn romaine lettece.
  4. {Take 2 medium of fresh ripe tomatos cut into wedges.
  5. {Get 10 of shavings of parmesan cheese.
  6. {Prepare 1 of !/2 cup olive oil.
  7. {Prepare 3 tbsp of fresh lemon juice.
  8. {Make ready 1 of tablesppon red wine vinegar.
  9. {Make ready 2 tbsp of mayonnaise.
  10. {Get 2 of garlic cloves minced.
  11. {Get 1/4 tsp of worcestershire sauce.
  12. {Prepare 1/4 tsp of dijon mustard.
  13. {Get 1/4 tsp of salt.
  14. {Prepare 1/4 tsp of blackmpepper.
  15. {Prepare 1/4 cup of grated parmesan cheese.
  16. {Make ready 1/4 tsp of of each , garlic salt, black pepper and parmesan cheese for sprinklng on hot potato croutons.

Steps to make My Version Caesar Salad with Sweet Potato "croutons":

  1. Heat enough oil in Dutch oven to come halfway up pan, heat oil to 350°F or until a potato cube sizzles when pit in oil.
  2. Fry potato cubes until brown and crispy, it can take 5 to 10 minutes depending on how moist the sweet potato's are drain on paper towels sprinkle with garlic salt mixture while hot.
  3. Meanwhile combine all dressing ingredients, oil, lemon, vinegar,minced garlic, Worcestershire sauce, Dijon mustard, mayonnaise, salt,pepper and the 1/4 cup grated parmesan cheese blend until very smooth.
  4. Toss romaine with some of the dressing and transfer to a platter surround lettuce with tomato's, drizzle a bit of dressing on each tomato Crumble parmesan shavings over salad top with hot sweet potato croutons and serve immediately.
  5. I have also made russet potato croutons for this salad and a combination of both!.

So that's going to wrap it up for this exceptional food my version caesar salad with sweet potato "croutons" recipe. Thank you very much for reading. I am confident you will make this at home. There's gonna be interesting food at home recipes coming up. Don't forget to save this page in your browser, and share it to your family, friends and colleague. Thanks again for reading. Go on get cooking!

Simple Way to Make Award-winning Best Bundt Cake

Simple Way to Make Award-winning Best Bundt Cake

Best Bundt Cake.

Best Bundt Cake

Hey everyone, it is Drew, welcome to my recipe site. Today, I'm gonna show you how to make a distinctive dish, best bundt cake. One of my favorites. This time, I am going to make it a bit unique. This is gonna smell and look delicious.

Best Bundt Cake is one of the most favored of current trending meals in the world. It's simple, it is fast, it tastes yummy. It's enjoyed by millions daily. Best Bundt Cake is something which I have loved my entire life. They're fine and they look fantastic.

To begin with this recipe, we have to first prepare a few ingredients. You can have best bundt cake using 6 ingredients and 6 steps. Here is how you can achieve that.

The ingredients needed to make Best Bundt Cake:

  1. {Prepare of butter.
  2. {Take of cream cheese.
  3. {Make ready of eggs.
  4. {Take of sugar.
  5. {Get of vanilla.
  6. {Get of flour.

Instructions to make Best Bundt Cake:

  1. Preheat oven to 300, grease bundt pan..
  2. Cream together butter and cream cheese.
  3. Stir in sugar 1 cup at a time.
  4. Add eggs one at a time, then add vanilla.
  5. Stir in flour one cup at a time.
  6. Bake for 60 minutes, cool in pan for 20 minutes before turning out to complete cooling.

So that is going to wrap this up with this special food best bundt cake recipe. Thanks so much for your time. I'm sure you will make this at home. There's gonna be interesting food at home recipes coming up. Remember to bookmark this page in your browser, and share it to your loved ones, friends and colleague. Thank you for reading. Go on get cooking!

Easiest Way to Prepare Super Quick Homemade Shrimp & Cauliflower “Grits”

Easiest Way to Prepare Super Quick Homemade Shrimp & Cauliflower “Grits”

Shrimp & Cauliflower “Grits”.

Shrimp & Cauliflower “Grits”

Hello everybody, hope you're having an amazing day today. Today, I'm gonna show you how to prepare a distinctive dish, shrimp & cauliflower “grits”. It is one of my favorites. For mine, I am going to make it a little bit tasty. This will be really delicious.

Shrimp & Cauliflower “Grits” is one of the most favored of current trending foods on earth. It is enjoyed by millions daily. It is easy, it's quick, it tastes yummy. They are nice and they look wonderful. Shrimp & Cauliflower “Grits” is something which I have loved my entire life.

To begin with this recipe, we have to prepare a few components. You can have shrimp & cauliflower “grits” using 11 ingredients and 7 steps. Here is how you cook that.

The ingredients needed to make Shrimp & Cauliflower “Grits”:

  1. {Get of riced cauliflower (frozen or room temperature) - or, if you're fancy, make your own damn cauliflower rice.
  2. {Take of chicken, vegetable broth or water.
  3. {Take of butter.
  4. {Prepare of half & half, milk or cream (optional).
  5. {Get of Thumb to finger of whatever cheese is on hand (cheddar, parm, mozzarella all work).
  6. {Take of cooked shrimp (enough for two people) - I use Costco's cilantro lime shrimp.
  7. {Make ready of BBQ sauce.
  8. {Make ready of hot italian sausages.
  9. {Get of Small sauté of mushrooms, tomatoes + onions.
  10. {Take of Jalapeños (optional).
  11. {Take of Arugula or other garnish.

Instructions to make Shrimp & Cauliflower “Grits”:

  1. Cut hot sausage into circles, sauté with mushrooms and tomatoes. Cover and keep warm..
  2. Heat up broth in skillet on medium. Use skillet you can pour into a blender from..
  3. Add package of riced cauliflower to broth. Cook, while stirring for 2-4 minutes, 'til soft..
  4. Pour cauliflower into blender. Add butter or half and half (optional, but yummy). Pulse ONCE, check consistency. Pulse once more if needed..
  5. Return contents of blender to pan, add cheese and desired spices (salt, pepper, garlic powder)..
  6. Sauté shrimp in BBQ sauce til warm..
  7. Plate. Add cauliflower grits to bowl, top with hot sausage and veggie mixture, then shrimp. Garnish with jalapeños, arugula and cracked pepper..

So that is going to wrap it up with this special food shrimp & cauliflower “grits” recipe. Thank you very much for reading. I'm sure you will make this at home. There is gonna be more interesting food in home recipes coming up. Remember to save this page in your browser, and share it to your loved ones, friends and colleague. Thanks again for reading. Go on get cooking!

Step-by-Step Guide to Prepare Ultimate Vegan Zebra Cake

Step-by-Step Guide to Prepare Ultimate Vegan Zebra Cake

Vegan Zebra Cake.

Vegan Zebra Cake

Hello everybody, it is Louise, welcome to our recipe site. Today, I'm gonna show you how to make a distinctive dish, vegan zebra cake. One of my favorites food recipes. For mine, I'm gonna make it a bit unique. This is gonna smell and look delicious.

Vegan Zebra Cake is one of the most well liked of recent trending foods on earth. It is appreciated by millions every day. It is easy, it is quick, it tastes delicious. They are fine and they look fantastic. Vegan Zebra Cake is something that I have loved my entire life.

To get started with this recipe, we have to prepare a few components. You can have vegan zebra cake using 18 ingredients and 7 steps. Here is how you can achieve it.

The ingredients needed to make Vegan Zebra Cake:

  1. {Make ready of Cake Batter.
  2. {Get 250 g of AP flour.
  3. {Make ready 80 g of brown sugar.
  4. {Prepare 80 g of granulated sugar.
  5. {Prepare 1 pinch of salt.
  6. {Take 7 g of baking powder.
  7. {Get 1/4 tsp of baking soda.
  8. {Take 220 ml of vegan buttermilk (soy milk + 1 tbsp vinegar).
  9. {Prepare 70 g of neutral oil.
  10. {Prepare of Vanilla Batter.
  11. {Take 1 packet of vanilla sugar (7,5g).
  12. {Prepare of Chocolate Batter.
  13. {Take 1 tbsp of cocoa powder, unsweetened.
  14. {Make ready 1 tbsp of soy milk.
  15. {Get of Chocolate Ganache.
  16. {Take 100 g of dark chocolate, chopped.
  17. {Prepare 50 g of soy milk.
  18. {Get 1 pinch of salt.

Steps to make Vegan Zebra Cake:

  1. Whisk all dry ingredients for the cake batter (flour, both types of sugar, salt, baking powder and soda)..
  2. Add wet ingredients for the cake batter (vegan buttermilk and oil)..
  3. Put approximately 1/3 of the batter in a separate bowl. Add in chocolate batter ingredients (cocoa powder and soy milk). Set aside..
  4. In the mixing bowl with 2/3 of the batter, add vanilla sugar. Adjust consistency with soy milk if needed. Both batters must have same consistency..
  5. In a parchment-lined round cake pan, add barely enough vanilla batter to cover bottom of the pan. Then, in the center of the vanilla batter, add a few tbsp of chocolate batter, don't go to the edge. Repeat steps until you run out of batter..
  6. Bake at 180°C for 25 min or until you insert a toothpick in the cake and it comes out clean..
  7. For the ganache: melt chocolate combined with milk in microwave at 30 sec increments. Stir in between. Add salt. Pour over your cake. Smooth out quickly with a spoon. Let cool and enjoy :).

So that is going to wrap it up with this exceptional food vegan zebra cake recipe. Thank you very much for reading. I'm confident you can make this at home. There's gonna be interesting food at home recipes coming up. Don't forget to bookmark this page on your browser, and share it to your family, colleague and friends. Thanks again for reading. Go on get cooking!

Recipe of Homemade Mexican Burrito

Recipe of Homemade Mexican Burrito

Mexican Burrito.

Mexican Burrito

Hello everybody, hope you're having an incredible day today. Today, we're going to prepare a distinctive dish, mexican burrito. One of my favorites food recipes. For mine, I will make it a little bit unique. This will be really delicious.

Mexican Burrito is one of the most popular of current trending meals on earth. It's enjoyed by millions daily. It is simple, it's quick, it tastes yummy. They are nice and they look wonderful. Mexican Burrito is something that I have loved my whole life.

To get started with this particular recipe, we have to first prepare a few ingredients. You can cook mexican burrito using 22 ingredients and 8 steps. Here is how you can achieve it.

The ingredients needed to make Mexican Burrito:

  1. {Prepare of Vegetables.
  2. {Make ready of cilantro.
  3. {Make ready of onion.
  4. {Get of tomatoes.
  5. {Make ready of limes.
  6. {Get of mexican rice.
  7. {Take of tomatoes.
  8. {Make ready of a small white or yellow onion.
  9. {Prepare of Chicken flavor Bouillon.
  10. {Make ready of Jasmyn rice.
  11. {Prepare of Corn oil.
  12. {Make ready of Mexican Beans.
  13. {Prepare of full of lard.
  14. {Make ready of Sea salt.
  15. {Get of Pinto beans.
  16. {Make ready of To top of the burrito.
  17. {Make ready of shredded monterey chedder cheese.
  18. {Make ready of Mexican Crema.
  19. {Make ready of Green Mexican Salsa.
  20. {Make ready of Must buy.
  21. {Get of LARGE flour tortillas.
  22. {Make ready of chopped up carne asada.

Instructions to make Mexican Burrito:

  1. In a small pot put the beans to boil. Add salt as soon as the beans start to boil.
  2. In a skillet keep the heat to medium. Add the lard. Once warm add the beans along with the juice left from the beans. Smash them as much as you can & set to the side on very low heat..
  3. On another skillet have some cooking oil heating up on medium. Add rice & cook until lightly brown. In a blender add rice, chicken bouillon and water as needed. Blend. Pour it in the rice. Let boil. Add water if needed. Set to side when ready..
  4. To the side chop up all the vegetables.
  5. In another skillet cook asada until Brown..
  6. On the flour tortillas add a bit of everything you just cooked and chopped up..
  7. Add the extras.
  8. Start folding the tortilla into a burrito form. And place on a flat skillet or pan to warm up the tortilla keep on medium-low cook long enough for the cheese to melt but not too much to where the tortilla Gets crunchy..

So that's going to wrap this up for this exceptional food mexican burrito recipe. Thank you very much for reading. I'm sure you will make this at home. There's gonna be interesting food at home recipes coming up. Don't forget to bookmark this page on your browser, and share it to your loved ones, colleague and friends. Thanks again for reading. Go on get cooking!

How to Make Quick Kimchi Sweet Vinegar Stir Fry with Shrimp and Eggplant

How to Make Quick Kimchi Sweet Vinegar Stir Fry with Shrimp and Eggplant

Kimchi Sweet Vinegar Stir Fry with Shrimp and Eggplant.

Kimchi Sweet Vinegar Stir Fry with Shrimp and Eggplant

Hey everyone, it's me, Dave, welcome to my recipe page. Today, I will show you a way to prepare a special dish, kimchi sweet vinegar stir fry with shrimp and eggplant. It is one of my favorites food recipes. This time, I'm gonna make it a bit unique. This will be really delicious.

Kimchi Sweet Vinegar Stir Fry with Shrimp and Eggplant is one of the most popular of current trending foods on earth. It's appreciated by millions daily. It is easy, it is quick, it tastes yummy. They're fine and they look wonderful. Kimchi Sweet Vinegar Stir Fry with Shrimp and Eggplant is something that I've loved my whole life.

To begin with this recipe, we must first prepare a few components. You can cook kimchi sweet vinegar stir fry with shrimp and eggplant using 16 ingredients and 8 steps. Here is how you cook that.

The ingredients needed to make Kimchi Sweet Vinegar Stir Fry with Shrimp and Eggplant:

  1. {Get of Eggplant (slim Japanese type).
  2. {Make ready of Red or green bell pepper (optional).
  3. {Take of to 10 Peeled shrimp (I recommend black tiger shrimp).
  4. {Prepare of *A. Katakuriko - to pretreat the shrimp.
  5. {Get of *A. Sake - to pretreat the shrimp.
  6. {Take of piece's worth Finely chopped ginger (or use grated ginger from a tube).
  7. {Make ready of heaping tablespoon Vegetable oil for stir frying (or sesame oil).
  8. {Prepare of ☆ Mitsuba or chopped green onions as garnish, optional.
  9. {Prepare of ☆ Mayonnaise, ra-yu.
  10. {Take of For the kimchi sweet-vinegar sauce.
  11. {Make ready of Kimchi (Use whatever kimchi you like. I used Chinese cabbage kimchi).
  12. {Prepare of B. Vinegar.
  13. {Take of heaping tablespoon B. Sugar (or honey).
  14. {Get of B. Soy sauce.
  15. {Make ready of B. Sake.
  16. {Prepare of B. Toasted sesame seeds, optional.

Instructions to make Kimchi Sweet Vinegar Stir Fry with Shrimp and Eggplant:

  1. Pre-treat the shrimp: Rub the *A katakuriko and sake into the deveined peeled shrimp..
  2. Prepare the vegetables: Cut the pepper and eggplant roughly into bite-sized pieces. Chop the ginger finely (or use pre-grated ginger from a tube)..
  3. Make the sweet vinegar sauce with kimchi: Drain off the kimchi lightly and chop it up finely. Add the B. ingredients to this and mix well. Now your sauce is done..
  4. Heat vegetable oil or sesame oil in a frying pan and stir fry the chopped ginger from Step 2 over low heat until fragrant..
  5. Add the eggplant and pepper to the frying pan, and stir fry over medium heat. Add the shrimp and stir fry until they change color..
  6. Add the kimchi vinegar sauce to the pan, and stir fry until there's no moisture left in the pan Sprinkle on some mitsuba or chopped green onions to finish..
  7. It's also delicious topped with mayonnaise or ra-yu. Serve chilled in the summer..
  8. Variation: Serve it on a bed of rice as a one-plate dish..

So that's going to wrap this up with this special food kimchi sweet vinegar stir fry with shrimp and eggplant recipe. Thank you very much for reading. I am confident that you will make this at home. There's gonna be interesting food at home recipes coming up. Remember to save this page in your browser, and share it to your family, colleague and friends. Thanks again for reading. Go on get cooking!

Recipe of Super Quick Homemade Grilled Glazed Chicken

Recipe of Super Quick Homemade Grilled Glazed Chicken

Grilled Glazed Chicken.

Grilled Glazed Chicken

Hello everybody, hope you are having an amazing day today. Today, I will show you a way to prepare a distinctive dish, grilled glazed chicken. One of my favorites. This time, I'm gonna make it a little bit unique. This is gonna smell and look delicious.

Grilled Glazed Chicken is one of the most favored of current trending meals on earth. It's easy, it is fast, it tastes delicious. It is enjoyed by millions daily. Grilled Glazed Chicken is something which I have loved my whole life. They are fine and they look fantastic.

To get started with this particular recipe, we have to first prepare a few ingredients. You can have grilled glazed chicken using 8 ingredients and 6 steps. Here is how you can achieve that.

The ingredients needed to make Grilled Glazed Chicken:

  1. {Make ready dozen of Chicken legs and thighs.
  2. {Make ready 1/4 cup of butter.
  3. {Take 1 tsp of minced garlic.
  4. {Take 1 tbsp of chives.
  5. {Take 2 tbsp of brown sugar.
  6. {Make ready 1/2 cup of honey.
  7. {Get 1/4 cup of ketchup.
  8. {Get 1 of seasoned salt and pepper (or chicken rub) to taste.

Steps to make Grilled Glazed Chicken:

  1. Season chicken evenly with rub or seasoned salt and pepper.
  2. In sauce pan, sauté garlic, brown sugar and chives in butter until well blended.
  3. Add ketchup and honey.
  4. Place chicken on grill at about 350°,and allow to cook until done. (Legs and thighs usually take a good 45mins, but every grill is different).
  5. When nearly done, brush with sauce and allow some cook time for the flavors to mingle..
  6. Remove from heat. Let chicken rest for 5mins and serve..

So that is going to wrap this up for this exceptional food grilled glazed chicken recipe. Thanks so much for your time. I'm confident that you will make this at home. There is gonna be more interesting food at home recipes coming up. Don't forget to bookmark this page on your browser, and share it to your family, colleague and friends. Thanks again for reading. Go on get cooking!

Easiest Way to Prepare Any-night-of-the-week Easy Asian Salmon with
Orange Sweet Glaze

Easiest Way to Prepare Any-night-of-the-week Easy Asian Salmon with Orange Sweet Glaze

Easy Asian Salmon with Orange Sweet Glaze.

Easy Asian Salmon with Orange Sweet Glaze

Hey everyone, it's John, welcome to my recipe page. Today, we're going to make a distinctive dish, easy asian salmon with orange sweet glaze. One of my favorites food recipes. This time, I'm gonna make it a bit unique. This will be really delicious.

Easy Asian Salmon with Orange Sweet Glaze is one of the most well liked of current trending meals on earth. It's enjoyed by millions every day. It's easy, it's quick, it tastes yummy. They're fine and they look wonderful. Easy Asian Salmon with Orange Sweet Glaze is something that I've loved my whole life.

To get started with this particular recipe, we must prepare a few components. You can have easy asian salmon with orange sweet glaze using 12 ingredients and 6 steps. Here is how you can achieve that.

The ingredients needed to make Easy Asian Salmon with Orange Sweet Glaze:

  1. {Get 1/4 c of sugar-free maple syrup.
  2. {Take 2 T of low-sodium soy sauce.
  3. {Make ready 1 T of brown sugar.
  4. {Take 1 T of Sesame oil.
  5. {Take 1 T of rice vinegar.
  6. {Take 1/2 tsp of hot sauce.
  7. {Make ready 1/2 tsp of ground ginger.
  8. {Get 4-4 oz of salmon fillets.
  9. {Make ready 1 tsp of corn starch.
  10. {Prepare 1/4 c of Tropicana Trop50 orange juice.
  11. {Make ready 1 tsp of sesame seeds.
  12. {Get 3 of green onions, thinly sliced.

Steps to make Easy Asian Salmon with Orange Sweet Glaze:

  1. In small bowl, whisk together syrup, soy sauce, sugar, oil, garlic powder, hot sauce and ginger..
  2. In baking dish, place fillets skin side down. Gently cut 3 shallow slits on top of each fillet. Pour marinade evenly over salmon, cover with foil and refrigerate 30-60 min..
  3. Preheat oven to 375°F. Bake salmon covered for 8 min. Uncover and bake until it flakes easily with a fork, 5-7 min..
  4. Transfer salmon to a plate, reserving marinade..
  5. In small pan, dissolve cornstarch in orange juice. Whisk constantly over med-high heat for 1 min. Add reserved marinade and bring to boil. Reduce heat and continue to whisk until sauce thickens, 2-3 min..
  6. Serve salmon with glaze and garnish with sesame seeds and green onions..

So that's going to wrap it up for this exceptional food easy asian salmon with orange sweet glaze recipe. Thanks so much for reading. I am confident you can make this at home. There's gonna be more interesting food at home recipes coming up. Remember to bookmark this page on your browser, and share it to your loved ones, friends and colleague. Thank you for reading. Go on get cooking!

Steps to Prepare Super Quick Homemade Cheesy Chicken, Bacon and
Broccoli Casserole

Steps to Prepare Super Quick Homemade Cheesy Chicken, Bacon and Broccoli Casserole

Cheesy Chicken, Bacon and Broccoli Casserole.

Cheesy Chicken, Bacon and Broccoli Casserole

Hey everyone, it is me again, Dan, welcome to our recipe site. Today, I'm gonna show you how to make a special dish, cheesy chicken, bacon and broccoli casserole. It is one of my favorites. This time, I'm gonna make it a little bit tasty. This is gonna smell and look delicious.

Cheesy Chicken, Bacon and Broccoli Casserole is one of the most favored of current trending foods on earth. It is enjoyed by millions every day. It's easy, it is quick, it tastes delicious. Cheesy Chicken, Bacon and Broccoli Casserole is something which I have loved my entire life. They are fine and they look fantastic.

To begin with this recipe, we must prepare a few ingredients. You can have cheesy chicken, bacon and broccoli casserole using 12 ingredients and 7 steps. Here is how you cook that.

The ingredients needed to make Cheesy Chicken, Bacon and Broccoli Casserole:

  1. {Make ready of chicken thighs.
  2. {Make ready of brown minute rice.
  3. {Take of crumbled bacon bits.
  4. {Take of shredded sharp cheddar cheese.
  5. {Make ready of milk.
  6. {Get of frozen broccoli flourets.
  7. {Make ready of Garlic Powder.
  8. {Prepare of Kosher salt.
  9. {Take of Ground black pepper.
  10. {Take of cream of mushroom condensed soup.
  11. {Prepare of cream of chicken condensed soup.
  12. {Prepare of dry ranch mix.

Instructions to make Cheesy Chicken, Bacon and Broccoli Casserole:

  1. Preheat oven to 350.
  2. Spray a 9"x13" caserole dish with cooking spray.
  3. Lay your chicken thighs down in it and sprinkle with salt and pepper..
  4. In a large bowl mix together the soups, milk, dry ranch, garlic, salt, pepper. Then mix in the rice. Then mix in the bacon bits and shredded cheese. Then the brocolli..
  5. Dump the mix over the chicken thighs.
  6. Cook uncovered for approximately 50 minutes or until chicken has reached proper internal temperature and rice is cooked through..
  7. Serve and enjoy!.

So that is going to wrap it up with this special food cheesy chicken, bacon and broccoli casserole recipe. Thanks so much for your time. I'm confident you will make this at home. There is gonna be interesting food at home recipes coming up. Remember to save this page on your browser, and share it to your family, colleague and friends. Thank you for reading. Go on get cooking!

Easiest Way to Make Award-winning Chocolate Cup Cake

Easiest Way to Make Award-winning Chocolate Cup Cake

Chocolate Cup Cake.

Chocolate Cup Cake

Hello everybody, it's me, Dave, welcome to our recipe page. Today, we're going to make a special dish, chocolate cup cake. One of my favorites. For mine, I will make it a bit tasty. This is gonna smell and look delicious.

Chocolate Cup Cake is one of the most well liked of recent trending foods on earth. It is appreciated by millions daily. It is easy, it is fast, it tastes yummy. They are fine and they look fantastic. Chocolate Cup Cake is something that I have loved my entire life.

To begin with this particular recipe, we have to first prepare a few ingredients. You can cook chocolate cup cake using 13 ingredients and 10 steps. Here is how you cook it.

The ingredients needed to make Chocolate Cup Cake:

  1. {Get of Mixture Of Chocolate.
  2. {Make ready of white flour.
  3. {Prepare of cocoa powder.
  4. {Get of baking soda.
  5. {Get of baking powder.
  6. {Take of eggs.
  7. {Take of vanilla essence.
  8. {Prepare of cup of milk (Medium size cup).
  9. {Get of cooking oil.
  10. {Get of Warm water half cup.
  11. {Get of Cooking chocolate.
  12. {Get of Unsalted Butter.
  13. {Make ready of Caster sugar (As your taste).

Steps to make Chocolate Cup Cake:

  1. Take a bowl and then add white flour with cocoa powder, baking soda, and baking powder and then mix it well..
  2. Melt the butter and cooking chocolate in warm water and add to the ingredient that we made last..
  3. Add 2 eggs with milk, oil,and vanilla essence and then beat it well with beater..
  4. Beat the better until it shows it's thickness..
  5. Take a baking tray and Grease it with oil or butter..
  6. Then pour the better in the baking tray and put it into oven for 30-35 mins on 250°c. (You can also bake it on stove).(For baking on stove I have mentioned it's process below)..
  7. You can take a large size pot and pour the 2 glass of water in it.Then put the bowl of better in it and bake it for 35-40 mins.(Be careful!! Don't let water in the better).Add water as same as you can see in the picture below..
  8. After 30-35 mins take out the cup cakes from oven. And for stove take the cup cakes out after 35-40 mins..
  9. Now take cooking chocolate and melt it in warm water and then decorate the cup cakes with chocolate.(If you like to decorate the cup cake with other decorating items, you can decorate it).
  10. Delicious, Soft, and Smooth Chocolate Cup Cakes are Ready!!😋😍.

So that is going to wrap this up for this special food chocolate cup cake recipe. Thank you very much for your time. I'm confident that you can make this at home. There is gonna be more interesting food in home recipes coming up. Remember to save this page in your browser, and share it to your family, colleague and friends. Thanks again for reading. Go on get cooking!

How to Make Perfect Spiced Peach

How to Make Perfect Spiced Peach

Spiced Peach.

Spiced Peach

Hello everybody, hope you're having an amazing day today. Today, I'm gonna show you how to prepare a special dish, spiced peach. It is one of my favorites food recipes. This time, I will make it a little bit tasty. This will be really delicious.

Spiced Peach is one of the most well liked of current trending meals on earth. It is simple, it is fast, it tastes delicious. It is enjoyed by millions daily. They're nice and they look fantastic. Spiced Peach is something that I have loved my entire life.

To get started with this recipe, we have to prepare a few components. You can have spiced peach using 7 ingredients and 8 steps. Here is how you cook it.

The ingredients needed to make Spiced Peach:

  1. {Get 1 of Peach.
  2. {Make ready 1/4 of cooking white wine.
  3. {Make ready 1 tsp of cinnamon.
  4. {Take 1 tsp of sugar.
  5. {Make ready 1 tsp of lime juice.
  6. {Get 1 of pecans.
  7. {Prepare 1/4 of praline.

Instructions to make Spiced Peach:

  1. Cut the peach down the middle and remove seed.
  2. Cover peach with lime juice.
  3. Sprinkle the peach with the cinnamon sugar and put to the side.
  4. Turn your stove on and place the peach cut side down.
  5. Add praline and pecans.
  6. When it starts to sizzle add the white wine and more lime Juice.
  7. Place the peach and sauce in the broiler let it cook until soft.
  8. Remove and serve over your favorite ice cream...enjoy.

So that's going to wrap this up with this exceptional food spiced peach recipe. Thank you very much for reading. I am sure that you will make this at home. There's gonna be interesting food in home recipes coming up. Remember to save this page on your browser, and share it to your family, friends and colleague. Thanks again for reading. Go on get cooking!

Easiest Way to Prepare Ultimate Blueberry Cheesecake 🫐 | Cheesecake
Without Baking

Easiest Way to Prepare Ultimate Blueberry Cheesecake 🫐 | Cheesecake Without Baking

Blueberry Cheesecake 🫐 | Cheesecake Without Baking.

Blueberry Cheesecake 🫐 | Cheesecake Without Baking

Hey everyone, I hope you are having an incredible day today. Today, I will show you a way to make a special dish, blueberry cheesecake 🫐 | cheesecake without baking. One of my favorites food recipes. This time, I'm gonna make it a bit unique. This will be really delicious.

Cheesecake Without Baking is one of the most well liked of recent trending foods on earth. It is simple, it's quick, it tastes yummy. It is enjoyed by millions daily. They are nice and they look fantastic. Blueberry Cheesecake 🫐

To get started with this recipe, we must prepare a few components. You can cook blueberry cheesecake 🫐 | cheesecake without baking using 18 ingredients and 12 steps. Here is how you cook it.

The ingredients needed to make Blueberry Cheesecake 🫐 | Cheesecake Without Baking:

  1. {Prepare of Cookie base:.
  2. {Make ready of ▪️140 g of shortbread cookies.
  3. {Make ready of ▪️80 g of butter.
  4. {Make ready of ▪️15 g of cocoa powder.
  5. {Get of Cheese base:.
  6. {Prepare of ▪️500 g cream cheese (maskrapone).
  7. {Make ready of ▪️180 g of 33% cream.
  8. {Take of ▪️100 g of powdered sugar for cheese + 30 g of powdered sugar for cream.
  9. {Take of ▪️10 + 10 g gelatin + 25 + 25 ml water.
  10. {Get of ▪️300 g of frozen berries + 30 g of sugar.
  11. {Make ready of ▪️30 g of poppy +80 g of water.
  12. {Make ready of Jelly:.
  13. {Prepare of ▪️125 g of fresh berries.
  14. {Prepare of ▪️Fresh mint.
  15. {Take of ▪️225 ml of water.
  16. {Take of ▪️2 tablespoons of sugar.
  17. {Get of ▪️15 g of gelatin + 35 ml of water.
  18. {Prepare of ▪️1 teaspoon of frozen berries or dye.

Instructions to make Blueberry Cheesecake 🫐 | Cheesecake Without Baking:

  1. ⬇️ ✅ Look for the video recipe on my YouTube channel https://youtu.be/w7Xo5RtlidE.
  2. ⌀ 21 cm. Let's prepare the form in which we will cook. Cover the bottom of the form with plastic wrap. Cover the side of the form with acetate film..
  3. Grind cookies in a blender mixed with cocoa and butter. Lay out on the bottom of the form. Put the form in the refrigerator for 30-40 minutes..
  4. Pour poppy seeds and gelatin with water..
  5. Heat the frozen berries on the stove with sugar. Cook until the sugar melts. Chop the berries with a blender and pass through a sieve. Stir and slowly pour the melted gelatin into the berries..
  6. Mix cheese with powdered sugar. In another bowl, mix the cream with the powdered sugar. Combine the whipped cream with the cheese mass..
  7. Add 200 grams of cream cheese to the berry puree and stir..
  8. Stirring, add the melted gelatin to the cheese. Drain the water from the poppies and add to the cheese mass. Stir..
  9. Get the cake out of the fridge. place the filling in the center. Put the cheesecake in the refrigerator for 1-2 hours.
  10. Berry jelly. Combine gelatin with water. Add sugar to the water and stir, add the frozen berry (to color). Add the melted gelatin and pass through a sieve..
  11. Garnish the cheesecake with fresh berries and mint. Pour half of the jelly and refrigerate for 15-30 minutes. When this time has passed, pour the rest of the jelly and refrigerate for at least 5 hours..
  12. Get out of the fridge and enjoy your beautiful and delicious cheesecake!.

So that's going to wrap it up for this exceptional food blueberry cheesecake 🫐 | cheesecake without baking recipe. Thanks so much for reading. I'm confident that you will make this at home. There is gonna be more interesting food in home recipes coming up. Remember to bookmark this page in your browser, and share it to your family, friends and colleague. Thank you for reading. Go on get cooking!

Step-by-Step Guide to Prepare Favorite Individual Cheesecakes

Step-by-Step Guide to Prepare Favorite Individual Cheesecakes

Individual Cheesecakes.

Individual Cheesecakes

Hey everyone, I hope you're having an amazing day today. Today, I'm gonna show you how to make a distinctive dish, individual cheesecakes. One of my favorites. This time, I will make it a bit unique. This is gonna smell and look delicious.

Individual Cheesecakes is one of the most well liked of current trending meals on earth. It's easy, it is fast, it tastes delicious. It is enjoyed by millions daily. Individual Cheesecakes is something that I've loved my entire life. They're fine and they look fantastic.

To begin with this particular recipe, we have to prepare a few components. You can cook individual cheesecakes using 6 ingredients and 6 steps. Here is how you cook that.

The ingredients needed to make Individual Cheesecakes:

  1. {Take 8 oz of cream cheese, softened.
  2. {Make ready 1/2 c of sugar.
  3. {Prepare 2 tsp of lemon juice.
  4. {Make ready 1/4 tsp of vanilla.
  5. {Get 1 of egg.
  6. {Take 1 pkg of Keebler's (Mini Graham Cracker Crust).

Steps to make Individual Cheesecakes:

  1. Preheat oven to 325 degrees..
  2. In a mixing bowl, beat cream cheese, sugar, lemon, juice, and vanilla on medium speed until fluffy. Add egg, beating until just combined..
  3. Place crusts on baking sheet. Evenly spread cream cheese mixture in each crust.
  4. Bake for 15 to 20 minutes or until knife inserted into filling 1 inch from edge comes clean..
  5. Refrigerate at least 2 hours for filling to set..
  6. Add your favorite pie topping. Enjoy!.

So that's going to wrap this up for this exceptional food individual cheesecakes recipe. Thank you very much for your time. I'm sure that you can make this at home. There's gonna be more interesting food in home recipes coming up. Remember to bookmark this page in your browser, and share it to your family, friends and colleague. Thanks again for reading. Go on get cooking!

Step-by-Step Guide to Make Perfect Plump Shrimp with Chili Sauce

Step-by-Step Guide to Make Perfect Plump Shrimp with Chili Sauce

Plump Shrimp with Chili Sauce.

Plump Shrimp with Chili Sauce

Hey everyone, I hope you're having an incredible day today. Today, we're going to prepare a distinctive dish, plump shrimp with chili sauce. It is one of my favorites food recipes. For mine, I'm gonna make it a little bit unique. This will be really delicious.

Plump Shrimp with Chili Sauce is one of the most well liked of current trending meals on earth. It is easy, it's quick, it tastes delicious. It is appreciated by millions daily. They're fine and they look fantastic. Plump Shrimp with Chili Sauce is something which I've loved my whole life.

To get started with this recipe, we must first prepare a few ingredients. You can cook plump shrimp with chili sauce using 15 ingredients and 11 steps. Here is how you cook that.

The ingredients needed to make Plump Shrimp with Chili Sauce:

  1. {Make ready of Shrimp.
  2. {Make ready of Salt.
  3. {Take of Katakuriko.
  4. {Take of Garlic, minced.
  5. {Prepare of Ginger, minced.
  6. {Get of Doubanjiang.
  7. {Make ready of ★Chinese soup stock.
  8. {Get of ★Sake.
  9. {Prepare of ★Ketchup.
  10. {Get of ★Sugar.
  11. {Get of ★Salt and pepper.
  12. {Prepare of Japanese leek, minced.
  13. {Get of Katakuriko slurry.
  14. {Take of Vegetable oil.
  15. {Make ready of Vinegar.

Instructions to make Plump Shrimp with Chili Sauce:

  1. Remove the shell, vein, and tail from the shrimp. Sprinkle with salt and rub with katakuriko. Rinse with water and dry..
  2. Lightly sprinkle salt onto Step 1 and then coat with katakuriko (1 teaspoon). Place into a pot of boiling water and boil for 40 seconds..
  3. Drain the water in a colander..
  4. Mince the Japanese leek, ginger, and garlic. Combine the ★ ingredients..
  5. Heat oil in a frying pan and saute the ginger and garlic. Add the doubanjiang and continue cooking. Add the shrimp from Step 3 and cook lightly..
  6. Add the combined ★ ingredients to Step 5..
  7. Add the minced leek to Step 6. When it comes to a boil, stop the heat and add the katakuriko slurry. Stir it quickly to combine and then turn on the heat and continue stirring..
  8. Lastly, swirl in the oil and vinegar and toss..
  9. Shred some lettuce and arrange it on a plate. Place the shrimp with chili sauce on the plate..
  10. You don't have to boil the shrimp in Step 2. You can just coat with the katakuriko and fry. Season with salt before coating with katakuriko..
  11. It's very convenient if you mince the ginger and garlic beforehand and keep some stocked in the freezer..

So that's going to wrap it up for this special food plump shrimp with chili sauce recipe. Thank you very much for reading. I am confident that you can make this at home. There is gonna be interesting food at home recipes coming up. Don't forget to save this page in your browser, and share it to your loved ones, friends and colleague. Thank you for reading. Go on get cooking!

Step-by-Step Guide to Prepare Quick Cottie's Chicken Aztec

Step-by-Step Guide to Prepare Quick Cottie's Chicken Aztec

Cottie's Chicken Aztec.

Cottie's Chicken Aztec

Hey everyone, I hope you are having an amazing day today. Today, we're going to prepare a special dish, cottie's chicken aztec. It is one of my favorites. For mine, I will make it a bit unique. This is gonna smell and look delicious.

Cottie's Chicken Aztec is one of the most popular of current trending foods in the world. It's simple, it's quick, it tastes delicious. It's appreciated by millions every day. Cottie's Chicken Aztec is something which I have loved my entire life. They are fine and they look wonderful.

To begin with this particular recipe, we must prepare a few ingredients. You can cook cottie's chicken aztec using 8 ingredients and 6 steps. Here is how you cook that.

The ingredients needed to make Cottie's Chicken Aztec:

  1. {Take 4 large of Chicken Breasts.
  2. {Get 1 can of Can Corn.
  3. {Take 1 can of Can Black Beans.
  4. {Prepare 1 cup of Salsa.
  5. {Make ready 1/2 tsp of Ground Cumin.
  6. {Make ready 8 oz of cream cheese.
  7. {Prepare 1 of garlic clove.
  8. {Make ready 2 cup of cooked rice.

Steps to make Cottie's Chicken Aztec:

  1. Combine everything but the chicken.
  2. Place half mix on the bottom of crockpot.
  3. Place Chicken on Salsa mix, cover with the rest of the mix..
  4. Cook on Low for 5 hours..
  5. Add cream cheese and cook until melted (30 - 45 minutes)..
  6. Serve over rice..

So that is going to wrap this up for this exceptional food cottie's chicken aztec recipe. Thanks so much for reading. I'm confident you will make this at home. There's gonna be interesting food at home recipes coming up. Remember to bookmark this page in your browser, and share it to your loved ones, friends and colleague. Thank you for reading. Go on get cooking!

Recipe of Any-night-of-the-week Kelly’s Beef and Broccoli

Recipe of Any-night-of-the-week Kelly’s Beef and Broccoli

Kelly’s Beef and Broccoli.

Kelly’s Beef and Broccoli

Hello everybody, I hope you are having an amazing day today. Today, we're going to prepare a distinctive dish, kelly’s beef and broccoli. One of my favorites. This time, I am going to make it a bit tasty. This will be really delicious.

Kelly’s Beef and Broccoli is one of the most popular of current trending meals on earth. It is simple, it is fast, it tastes delicious. It is enjoyed by millions every day. Kelly’s Beef and Broccoli is something which I've loved my whole life. They are nice and they look wonderful.

To get started with this particular recipe, we must prepare a few ingredients. You can cook kelly’s beef and broccoli using 9 ingredients and 5 steps. Here is how you can achieve it.

The ingredients needed to make Kelly’s Beef and Broccoli:

  1. {Get 1 lb of top round steak.
  2. {Prepare 3 tbsp of cornstarch.
  3. {Make ready 1/2 cup of low sodium soy sauce.
  4. {Make ready 3 tbsp of light brown sugar.
  5. {Prepare 1 tbsp of minced garlic.
  6. {Get 2 tsp of grated ginger.
  7. {Get 2 tbsp of vegetable oil.
  8. {Make ready 1/2 cup of sliced white onions.
  9. {Get of White Rice.

Steps to make Kelly’s Beef and Broccoli:

  1. In a large bowl, whisk together 2 tablespoons cornstarch with 3 tablespoons water. Add the beef to the bowl and toss to combine..
  2. In a separate small bowl, whisk together the remaining 1 tablespoon cornstarch with the soy sauce, brown sugar, garlic and ginger. Set the sauce aside..
  3. Heat a large nonstick sauté pan over medium heat. Add 1 tablespoon of the vegetable oil and once it is hot, add the beef and cook, stirring constantly until the beef is almost cooked through. Using a slotted spoon, transfer the beef to a plate and set it aside..
  4. Add the remaining 1 tablespoon of vegetable oil to the pan and once it is hot, add the broccoli florets and sliced onions and cook, stirring occasionally, until the broccoli is tender, about 4 minutes..
  5. Return the beef to the pan then add the prepared sauce. Bring the mixture to a boil and cook, stirring, for 1 minute or until the sauce thickens slightly. Serve with rice or noodles..

So that's going to wrap it up with this exceptional food kelly’s beef and broccoli recipe. Thank you very much for your time. I am sure that you will make this at home. There is gonna be interesting food at home recipes coming up. Don't forget to bookmark this page in your browser, and share it to your loved ones, colleague and friends. Thank you for reading. Go on get cooking!

Simple Way to Make Super Quick Homemade Slow Cooker Peach Cobbler

Simple Way to Make Super Quick Homemade Slow Cooker Peach Cobbler

Slow Cooker Peach Cobbler.

Slow Cooker Peach Cobbler

Hey everyone, I hope you're having an amazing day today. Today, I'm gonna show you how to prepare a distinctive dish, slow cooker peach cobbler. It is one of my favorites food recipes. This time, I will make it a bit unique. This will be really delicious.

Slow Cooker Peach Cobbler is one of the most popular of recent trending foods in the world. It is simple, it is quick, it tastes delicious. It is enjoyed by millions every day. They are fine and they look wonderful. Slow Cooker Peach Cobbler is something which I've loved my entire life.

To get started with this particular recipe, we have to first prepare a few ingredients. You can cook slow cooker peach cobbler using 4 ingredients and 2 steps. Here is how you can achieve that.

The ingredients needed to make Slow Cooker Peach Cobbler:

  1. {Prepare of Peach Pie Filling.
  2. {Get of Vanilla Cake Mix.
  3. {Get of Unsalted Butter.
  4. {Take of Walnuts.

Steps to make Slow Cooker Peach Cobbler:

  1. Put pie filling in the bottom on slow cooker. Sprinkle cake mix over pie filling. Cut butter in chunks and spread over cake mix. Sprinkle walnuts on top..
  2. Turn slow cooker to high for 2-2/2 hours. Serve in a bowl topped with your choice of ice cream (if desired).

So that's going to wrap it up for this exceptional food slow cooker peach cobbler recipe. Thank you very much for reading. I'm sure that you will make this at home. There is gonna be interesting food at home recipes coming up. Don't forget to save this page on your browser, and share it to your family, friends and colleague. Thank you for reading. Go on get cooking!

Steps to Make Speedy Nutella's French Toast

Steps to Make Speedy Nutella's French Toast

Nutella's French Toast.

Nutella's French Toast

Hello everybody, it is Brad, welcome to my recipe site. Today, I will show you a way to prepare a special dish, nutella's french toast. One of my favorites. This time, I am going to make it a bit unique. This will be really delicious.

Nutella's French Toast is one of the most popular of recent trending foods on earth. It's enjoyed by millions every day. It is easy, it is fast, it tastes delicious. They're nice and they look fantastic. Nutella's French Toast is something that I have loved my whole life.

To begin with this particular recipe, we have to prepare a few ingredients. You can cook nutella's french toast using 7 ingredients and 7 steps. Here is how you cook that.

The ingredients needed to make Nutella's French Toast:

  1. {Get 2 of Eggs.
  2. {Make ready of Milk.
  3. {Take of Cinnamon.
  4. {Make ready of Butter.
  5. {Take 1 of Nutella.
  6. {Prepare 1 of Strawberries.
  7. {Make ready 2 slice of Toast Bread.

Steps to make Nutella's French Toast:

  1. Crack 2 eggs and put them in a bowl. Then whisk them..
  2. Add a bit of milk in the bowl, then mix it with the eggs..
  3. Add a bit of cinnamon in the bowl, then mix it with the milk and the eggs..
  4. Soak a slice of bread on both sides in the mixture..
  5. Add a piece of butter in a pan, just to let not stick the bread..
  6. Add a slice of bread in the pan and cook each side for a couple of minutes. Pay attention: the bread mustn't be burnt, too dry or raw..
  7. Once it's cooked, garnish it with a lot of nutella (yum!) and strawberries. If you don't like nutella or strawberries you can use anything else, such as honey or jam..

So that's going to wrap this up with this exceptional food nutella's french toast recipe. Thank you very much for reading. I'm confident you can make this at home. There is gonna be interesting food in home recipes coming up. Remember to bookmark this page on your browser, and share it to your loved ones, colleague and friends. Thank you for reading. Go on get cooking!

Recipe of Ultimate Momma's French toast sticks

Recipe of Ultimate Momma's French toast sticks

Momma's French toast sticks.

Momma's French toast sticks

Hey everyone, it is Drew, welcome to our recipe site. Today, I will show you a way to prepare a special dish, momma's french toast sticks. It is one of my favorites food recipes. This time, I will make it a bit unique. This will be really delicious.

Momma's French toast sticks is one of the most popular of current trending foods on earth. It's enjoyed by millions daily. It's simple, it's quick, it tastes delicious. They're nice and they look wonderful. Momma's French toast sticks is something that I have loved my whole life.

To get started with this particular recipe, we must first prepare a few ingredients. You can cook momma's french toast sticks using 7 ingredients and 6 steps. Here is how you can achieve that.

The ingredients needed to make Momma's French toast sticks:

  1. {Make ready 4 slice of bread.
  2. {Make ready 4 of eggs.
  3. {Prepare 2 tbsp of milk.
  4. {Get pinch of nutmeg.
  5. {Prepare tsp of vanilla extract.
  6. {Get 1/4 cup of brown sugar.
  7. {Prepare 1 tbsp of coconut oil.

Steps to make Momma's French toast sticks:

  1. Heat pan to medium low.
  2. In a bowl whisk eggs, milk, vanilla extract, sugar and nutmeg.
  3. Cut each piece of bread into 4 sticks.
  4. Dip bread pieces into egg mixture and fry in coconut oil until golden brown..
  5. Use whatever kind of syrup you like and enjoy..
  6. You can play with the flavor profile a bit if you want. Instead of vanilla extract you can use orange extract and chocolate syrup etc. Etc. Etc..

So that is going to wrap it up with this special food momma's french toast sticks recipe. Thank you very much for reading. I'm sure you will make this at home. There is gonna be more interesting food at home recipes coming up. Remember to bookmark this page on your browser, and share it to your loved ones, friends and colleague. Thanks again for reading. Go on get cooking!

Recipe of Quick Santa Fe Chicken

Recipe of Quick Santa Fe Chicken

Santa Fe Chicken.

Santa Fe Chicken

Hello everybody, it's me, Dave, welcome to our recipe page. Today, we're going to make a special dish, santa fe chicken. It is one of my favorites food recipes. For mine, I am going to make it a bit tasty. This is gonna smell and look delicious.

Santa Fe Chicken is one of the most favored of recent trending foods in the world. It is easy, it is quick, it tastes yummy. It's appreciated by millions every day. They're nice and they look fantastic. Santa Fe Chicken is something which I've loved my whole life.

To get started with this particular recipe, we must first prepare a few ingredients. You can cook santa fe chicken using 8 ingredients and 5 steps. Here is how you cook that.

The ingredients needed to make Santa Fe Chicken:

  1. {Make ready of large onion.
  2. {Make ready of butter.
  3. {Take of chicken broth.
  4. {Prepare of salsa.
  5. {Get of uncooked long grain rice.
  6. {Get of garlic powder.
  7. {Prepare of boneless chicken breast halves.
  8. {Make ready of shredded cheddar cheese.

Steps to make Santa Fe Chicken:

  1. In large skillet, saute onion in butter until tender..
  2. Add broth and salsa, bring to boil..
  3. Stir in rice and garlic powder. Place chicken over rice, cover and simmer for 10 minutes..
  4. Turn chicken and cook 10 - 15 minutes until meat juice runs clear..
  5. Remove from heat and sprinkle with cheese. Cover and let stand for 5 minutes..

So that is going to wrap this up for this exceptional food santa fe chicken recipe. Thank you very much for your time. I'm sure that you will make this at home. There's gonna be more interesting food at home recipes coming up. Remember to save this page in your browser, and share it to your family, friends and colleague. Thank you for reading. Go on get cooking!

Steps to Make Any-night-of-the-week Cheesy chicken and shrimp goodness

Steps to Make Any-night-of-the-week Cheesy chicken and shrimp goodness

Cheesy chicken and shrimp goodness. Here is how you achieve that. Here is how you achieve that. I like to make the grits first so they're perfect and smooth.

Cheesy chicken and shrimp goodness Keyword cheesy chicken, chicken and shrimp recipes, chicken skillet. This is a common dish you will find in many restaurants across the Southeastern USA. I like my sauce a little smokey.

Hey everyone, I hope you are having an amazing day today. Today, I will show you a way to make a special dish, cheesy chicken and shrimp goodness. One of my favorites food recipes. This time, I am going to make it a bit unique. This will be really delicious.

Cheesy chicken and shrimp goodness is one of the most well liked of current trending meals in the world. It is easy, it's fast, it tastes yummy. It's enjoyed by millions every day. They are fine and they look fantastic. Cheesy chicken and shrimp goodness is something which I've loved my whole life.

Here is how you achieve that. Here is how you achieve that. I like to make the grits first so they're perfect and smooth.

To begin with this recipe, we have to first prepare a few components. You can have cheesy chicken and shrimp goodness using 11 ingredients and 6 steps. Here is how you cook it.

The ingredients needed to make Cheesy chicken and shrimp goodness:

  1. {Get 4 of chicken tenderloin strips.
  2. {Take 1 bag of frozen mediim size cooked shrimp.
  3. {Make ready 1 of olive oil.
  4. {Take 2 cup of cooked white rice.
  5. {Take 1 of salsa of your choice, i used the On the border brand.
  6. {Take 1 block of of mexican dipping cheese.
  7. {Get 1 of milk.
  8. {Make ready 1 of salt.
  9. {Make ready 1 of onion powder.
  10. {Prepare 1 of garlic powder.
  11. {Get 1 of ground black pepper.

Bring chicken broth to a boil over medium-high heat; stir in grits. Cheesy Shrimp and Grits. this link is to an external site that may or may not meet accessibility. We use chicken broth + water to cook the grits. Ours has a ton of cheddar, which.

Steps to make Cheesy chicken and shrimp goodness:

  1. Cook rice according to package directions. Set aside..
  2. Add just enough olive oil to coat your.pan and set your.heat on med-high. Add your chicken and cook for a couple minutes on each side then use.your spatula to break the chicken into bite.size pieces. While the chicken is cooking, thaw shrimp by rinsing under cool water then remove the tails. Cook the chicken until done then add the shrimp..
  3. Add dash of salt, your garlic powder, onion powder, And pepper all to taste. Continue cooking just until shrimp is heated through..
  4. Add the salsa, also to tAste, to your rice and mix well. Put.in microwave for a few minutes And while thats heating.chop or shred your cheese and add your milk. You can go by the package directions but I never do lol!.
  5. Once.your rice is done remove from microwave and put In the cheese. Heat a little at a time stirring in between heating sessions..
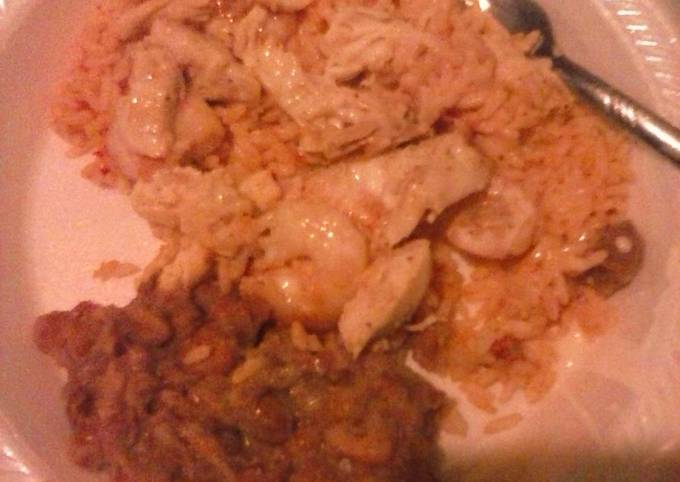
  6. Once your done, place desired amount of rice on your plate and add chicken and shrimp on top. Next add lots of cheese and enjoy: ) if you don't wAnt it this way you could make tacos with it adding.beans on bottom. Thats what I did for my kids using the nacho cheese flavored shells and they loved it!.

This one-dish chicken and shrimp combination mixes in Southern staples for a flavorful meal in just one pan. It's one of our best chicken and shrimp recipes yet. This Cheesy Chicken Pasta is the perfect dinner any night of the week. It's packed with creamy, rich, cheesy goodness, with tender It's packed with creamy, rich, cheesy goodness, with some tender chicken and spinach to balance everything out! BEST chicken mince recipes - dinner ideas!

So that is going to wrap this up with this exceptional food cheesy chicken and shrimp goodness recipe. Thank you very much for your time. I am sure that you can make this at home. There's gonna be more interesting food in home recipes coming up. Remember to save this page on your browser, and share it to your loved ones, colleague and friends. Thank you for reading. Go on get cooking!

Step-by-Step Guide to Make Favorite Sponge Cake

Step-by-Step Guide to Make Favorite Sponge Cake

Sponge Cake.

Sponge Cake

Hello everybody, it's Jim, welcome to our recipe page. Today, we're going to make a distinctive dish, sponge cake. It is one of my favorites. This time, I will make it a bit tasty. This is gonna smell and look delicious.

Sponge Cake is one of the most favored of current trending foods on earth. It's easy, it's fast, it tastes delicious. It is appreciated by millions every day. They are fine and they look fantastic. Sponge Cake is something which I have loved my entire life.

To get started with this particular recipe, we have to first prepare a few components. You can cook sponge cake using 14 ingredients and 6 steps. Here is how you cook it.

The ingredients needed to make Sponge Cake:

  1. {Take of baking powder.
  2. {Take of magarine.
  3. {Take of or 11/2 cups sugar.
  4. {Make ready of vanilla essence.
  5. {Make ready of eggs.
  6. {Make ready of flour.
  7. {Prepare of hot water (not boiling).
  8. {Prepare of Flavouring.
  9. {Take of Zest of 1 lime.
  10. {Prepare of Angostura Bitters.
  11. {Prepare of ground spice.
  12. {Take of ground clove.
  13. {Prepare of lemon juice.
  14. {Get of rum.

Instructions to make Sponge Cake:

  1. Cream together margarine and sugar until light and fluffy..
  2. Add vanilla essence and butters..
  3. Best in eggs one at a time making sure to beat each egg in well before adding the next one..
  4. Sift dry ingredients with spice and clove. Then fold this into egg mixture gradually..
  5. Add lime zest, lemon juice and rum. Then add hot water..
  6. Pour into greased and floured cake pans and bake at 325- 350 degrees Fahrenheit for 30 -40 mins or until tester comes out clean..

So that is going to wrap this up for this special food sponge cake recipe. Thank you very much for reading. I'm confident you can make this at home. There's gonna be interesting food at home recipes coming up. Remember to bookmark this page on your browser, and share it to your loved ones, friends and colleague. Thanks again for reading. Go on get cooking!

Easiest Way to Prepare Super Quick Homemade Strawberry ice box cake

Easiest Way to Prepare Super Quick Homemade Strawberry ice box cake

Strawberry ice box cake.

Strawberry ice box cake

Hello everybody, I hope you are having an incredible day today. Today, I will show you a way to prepare a distinctive dish, strawberry ice box cake. One of my favorites. For mine, I will make it a little bit unique. This is gonna smell and look delicious.

Strawberry ice box cake is one of the most well liked of current trending meals on earth. It is appreciated by millions every day. It's simple, it is quick, it tastes yummy. They are nice and they look fantastic. Strawberry ice box cake is something that I've loved my entire life.

To get started with this recipe, we have to prepare a few components. You can have strawberry ice box cake using 3 ingredients and 3 steps. Here is how you can achieve it.

The ingredients needed to make Strawberry ice box cake:

  1. {Get of Fresh Strawberries.
  2. {Get of Graham Crackers.
  3. {Get of Whipped Crean.

Instructions to make Strawberry ice box cake:

  1. Put a whipped cream in a tray and put some graham crackers on the top of whipped cream and put some whipped cream again on the top of graham.
  2. Then put some fresh strawberries on the top of whipped cream put some whipped cream again and make it again and again graham whipped cream and strawberries.
  3. Refrigerate it for 3 hours and then you can taste it.

So that is going to wrap it up for this special food strawberry ice box cake recipe. Thanks so much for reading. I'm sure that you can make this at home. There is gonna be more interesting food at home recipes coming up. Remember to save this page on your browser, and share it to your loved ones, friends and colleague. Thank you for reading. Go on get cooking!

How to Make Super Quick Homemade Brad's Chicken Verde casserole over
Spanish rice

How to Make Super Quick Homemade Brad's Chicken Verde casserole over Spanish rice

Brad's Chicken Verde casserole over Spanish rice.

Brad's Chicken Verde casserole over Spanish rice

Hello everybody, it is Jim, welcome to my recipe page. Today, we're going to make a special dish, brad's chicken verde casserole over spanish rice. It is one of my favorites. For mine, I'm gonna make it a little bit tasty. This is gonna smell and look delicious.

Brad's Chicken Verde casserole over Spanish rice is one of the most popular of current trending foods in the world. It's easy, it is fast, it tastes delicious. It is enjoyed by millions daily. Brad's Chicken Verde casserole over Spanish rice is something which I have loved my whole life. They're fine and they look wonderful.

To begin with this particular recipe, we have to first prepare a few components. You can cook brad's chicken verde casserole over spanish rice using 30 ingredients and 6 steps. Here is how you can achieve it.

The ingredients needed to make Brad's Chicken Verde casserole over Spanish rice:

  1. {Make ready of For the chicken.
  2. {Get of boneless chicken breast, cubed.
  3. {Get of LG onion.
  4. {Take of garlic, minced.
  5. {Get of salsa verde.
  6. {Get of each; cumin, Chile powder, white pepper.
  7. {Take of smoked paprika.
  8. {Prepare of canola oil.
  9. {Take of jalapeño, seeded and diced.
  10. {Take of For the rice.
  11. {Get of white rice.
  12. {Take of each; garlic powder, cumin, Chile powder, white pepper.
  13. {Prepare of smoked paprika.
  14. {Get of tomato-chicken bouillon.
  15. {Take of can stewed tomatoes.
  16. {Make ready of water.
  17. {Prepare of butter.
  18. {Prepare of For the dough.
  19. {Make ready of Mesa flour.
  20. {Prepare of granulated chicken bouillon.
  21. {Prepare of baking powder.
  22. {Take of hot water.
  23. {Get of shortening or lard.
  24. {Prepare of Other ingredients.
  25. {Get of Limes.
  26. {Make ready of shredded cheddar cheese.
  27. {Make ready of melted garlic butter.
  28. {Make ready of cilantro, chopped.
  29. {Take of Roasted jalapeños.
  30. {Prepare of LG pasilla peppers.

Instructions to make Brad's Chicken Verde casserole over Spanish rice:

  1. Start with the filling. Heat oil in a LG frying pan. Add onion. Saute for 5 minutes to sweat onions, don't brown. Add chicken, garlic, and seasonings. Cook until chicken is almost done, just a little bit of pink. Do not drain juices. Add salsa and a quarter cup of chopped cilantro. Either make your own or buy the salsa. I used my recipe for roasted salsa verde. Bring salsa to a simmer. Slowly add Mesa flour while stirring constantly until you reach your desired thickness..
  2. Meanwhile char the skins of the pasilla peppers. If you have a gas range, place directly over burner. If not place directly on top oven rack and broil on hi. The key is to char the skins quickly. When all the skin is charred, place in a plastic bag. Seal and let sit for 10 minutes. Remove all skin and seeds from peppers. Tear open so pepper lays flat..
  3. Next make the dough. Mix all the dry ingredients in a mixing bowl. Cut in the lard or shortening. Mix in the hot water until well combined..
  4. Grease a large casserole dish. Lay in chicken mixture. Next lay the peppers over the top. Cover with cheddar cheese. Evenly spread the dough over that. Brush with melted garlic butter. Place in the oven at 400 until filling is bubbly and dough browns slightly..
  5. While in the oven, melt butter in a fry pan for the rice. Add dry rice to pan and cook 3-4 minutes stirring constantly. Add rest of rice ingredients. Stir well. Cover and cook on low until water is nearly absorbed. Do not stir. Turn off heat and let sit on burner covered for 10 minutes..
  6. Plate rice. Place casserole on top. Garnish with limes, cilantro, and jalapeño. Serve immediately. Enjoy..

So that's going to wrap it up with this special food brad's chicken verde casserole over spanish rice recipe. Thank you very much for reading. I'm confident you can make this at home. There's gonna be interesting food at home recipes coming up. Don't forget to save this page in your browser, and share it to your loved ones, colleague and friends. Thank you for reading. Go on get cooking!